Saturday 8 August 2020

Flint and Feather


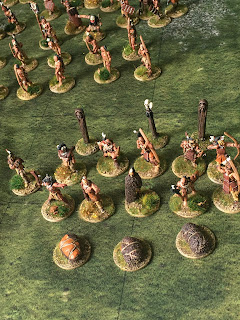
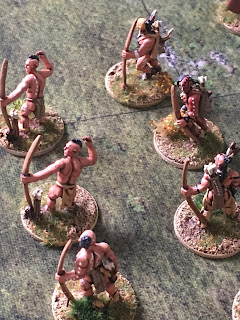
I've had my eyes on Flint and Feather by Crucible Crush for quite a while, mostly due to the superb range of figures that accompany the game, which are simply stunning and a pleasure to paint. I finally took the plunge and ordered the rule book 2 starter warparties, the Huron/Wendot and the Iroquois/ Haudenosaune, along with the Iroquoian Spirit Creatures and some Iroquoian Companions, Great Warriors, Striplings and battle posts and fur trade markers. All are now painted up and ready to play, and since completing them I've added a set of 3 canoes. My favourite figure is the naked bear from the Spirit Creatures set.
As a bonus I've more than enough figures to field a Skraeling force for SAGA, a faction I've wanted to try out.


Click on any picture to enlarge

SAGA Skraelings


The Fearsome Flying Head


The Great Horned Serpent


Stone Coat Giant Man


The Naked Bear Spirit Creature

Saturday 1 August 2020

Late Roman Church

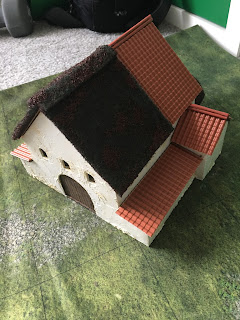
28mm Late Roman Church for SAGA, Dux Brittaniarum and Dux Bellorum.

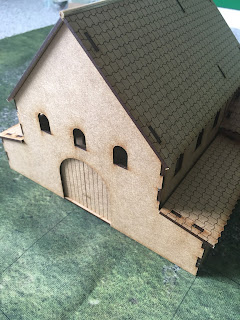
The model is from Warbases, and is a lovely little kit. I've used it as a base to build the Late Roman Church I had in mind that would fit into the world of post Roman Britain.

Pictures include the base model and work inprogress of the build as I've promised those on a Facebook page.

The Build


I really wanted to get the curved look to the chancel area of the church, and used several layers of Ranger Smooth texture paste to build up layers until I was happy with the look. I wasn't concerned about coming level with the existing roof as the thatch would overhang.

Then Ranger smooth texture paste was added to the walls of the church until I got the effect I was after. Once dried I used fine sand Marabu structure paste to add broken areas to the walls that were later picked out with Foundry Moss triad (29), I did use a wash of Army Painter Strong Tone Ink over the base coat of Foundry Moss, then highlighted up using the triad once dry.

I had to modify the supports to the flat roof sections to make it easier to remove and replace once the texture had been applied to the walls (picture attached).

The tiled roof sections were added, I used hot glue to attach (no room for error!). These come in vac formed A4 sheets from Empires at War and cut easily with scissors.

Bamboo BBQ skewers were used to create the ridge for the tiled sections, 2 at the bottom one piece on top. Some trimming was required of the side roof to allow the main roof section to sit properly (picture attached).

Smooth texture paste was used to fill in gaps of the tiled section, and the ridge pieces. These were later painted with Foundry Terracota (37B).

Pan scourers were cut and added (once again with hot glue) to the chancel and roof sections I wanted to cover with thatch. It best to fold and crease the ridge section of the thatch in half length ways as it makes adding easy. The roof was then given a heavy brushing with cheap artists acrylic Burnt Umber, I wasn't bothered about getting a uniform coverage as I was happy with some of the original green showing underneath. The thatch area was then brushed with Vallejo Green Brown (879) and Vallejo Green Ochre (914).

The walls were painted with Vallejo Beige (917), then over brushed with Vallejo Ivory (918) then Vallejo Off-white (820).

Wooden areas were painted with Citadel Colour Wyldwood. The door was then highlighted with Foundry Bay Brown (42)

Finally the Chi-Ro was added using Foundry Madder Red (60)

The texture pastes and pan scourers were found on Amazon. I also used a cheap set of artists spatulas for adding the texture pastes, also off Amazon.


FRESH 365 10 Pack Of Heavy Duty Green Catering Kitchen Sponge Scourer Pads

Marabu Structure Paste, White

Ranger Paste-Texture, Acrylic, Multicolour, 6.22x6.22x6.35 cm

5-Piece Painting Knife Set, GoFriend Stainless Steel Spatula Palette Knife Painting Mixing Scraper Oil Painting Accessories Color Mixing


Click on pictures to enlarge