I thought I'd try something a little different for the blog and include a few posts on how I tackle the hobby. First up a piece about how I paint my miniatures, or more accurately how I'm tackling the stock pile.
In the beginning there was a pile of miniatures.....
I don't think I'm on my own in the wargaming world in possessing a substantial stock pile of miniatures, not only are these in many scales but the once fondly referred to lead pile now contains a substantial amount of neatly boxed plastic offerings, and dare I say it the odd resin casting!
This last year I reflected on my accumulated hobby pile as I found myself moving not for the first time more boxes of unpainted models than painted. There was an obvious cause, I buy more than I can paint, simple really. So I set about thinking over what my options were and came up with the following -
- Sell excess on ebay and start again - this really doesn't appeal to me, particularly as I scour Ebay for the odd bargain and given enough time I'll just end up trading one pile of miniatures for another, more than likely at a financial loss as well.
- Carry on as normal, self explanatory really, I'd reached the point where I have to do something about the problem again...
- Change what I do - this may seem obvious but it also presents another set of options to ponder.
Change What I Do
After more thought I was left with the following to ponder -
- Buy painted miniatures, or hire a painter. This isn't a viable option for myself for a number of reasons, financial included but most critically I actually like painting. It may however be the most appropriate option for other hobbyists. There are many painting services out there and it may actually prove more cost effective to get your figures painted professionally if, and it is a big if, you can stick to a budget and spend only what you'd normally spend. As a consequence you'll be the proud owner of finished units and no unpainted miniatures! This however may prove too difficult challenge if you have magpie syndrome, shiny shiny......
- How to increase my painting output. This is the one for me, it poses a technical and artistic challenge but is also proving to be very rewarding. It has also helped me consolidate my thoughts on How I Paint Miniatures and formulate a plan going forward. I have always sought to paint my miniatures to the highest standard that I can manage, and this has naturally developed over time, but instead of speeding up my output it has remained consistent even though the standard has increased. Therefore I decided to look at everything I do to achieve that finished unit.
How I paint miniatures - what works for me
Below are some pictures of my painting table, apart from the mess, it shows that I have a number of painting projects on the go at any one time and at various stages of completion.
A number of decisions were made, the biggest of these involves painting standard/style.
Over the years I have acquired many different painting techniques and these are continually evolving.
After much soul searching I decided to do the following -
- Paint one project in this case my WSS to my highest standard. That takes care of my perfectionist streak.
- Paint other projects to a style that suits. 1866 and Franco Prussian War to a simple block colour, black left unshaded.
- Reduced standard/style. Still apply highlights/shading, however don't get hung up on every little detail on the figure. This is hardest to come to terms with, letting go and judging what will work well on the table. I try to remember that out of the 200+ miniatures at 3ft+ distance based in units, is anyone really going to notice that one figure where the button isn't painted! Every part of the mini doesn't need multiple highlights, if it looks okay leave it alone!
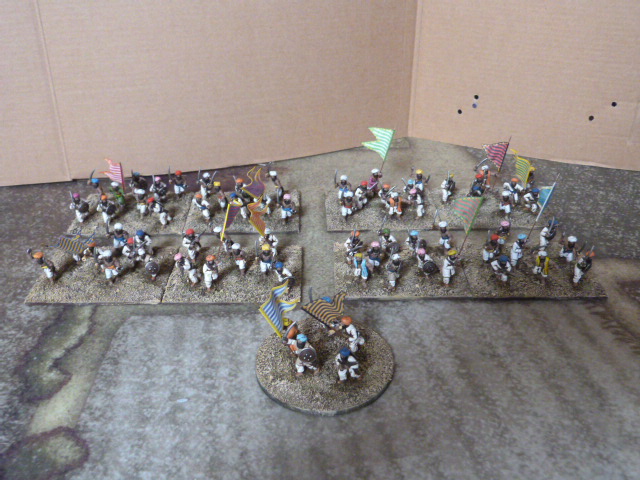
- Paint units, establish what is manageable. This is easier said that done. I paint units of varying size, cavalry in 6s, infantry in batches of 8, 16, 24, 32, I find mixing it up numbers wise helps. A word of caution, many years ago a I tackled 100 Celts and although I painted them quickly I felt drained at the end.
- Base more than one figure on a stand for painting. I use old paint pots and lolly pop sticks (bought cheaply from local shops, often in the kids craft section). I find it has increased my painting speed, see picture below. I do still base a single figure on a pot, it all depends on the miniatures (more on that further down).


- Paint every opportunity I can, little and often is better than nothing or a long stint. Turn the TV off, they don't paint themselves. Audio books and music help.
- Don't paint one tester figure, quite often this ends up taking too long and I paint to a higher standard than the unit I intend to complete! Just do it....
- Do not mix my own shades, use triage sets like Foundry.
- Use a superglue accelerator.
- Think production line, I constantly have figures prepped for undercoating, undercoated, part painted, painted awaiting varnishing, varnished, and being based. I do what I feel like, so none of the tasks become a chore.

- Use coloured spray undercoats. This is something I have done on a small trial, and will probably expand upon in the good weather. Which also brings me to spray undercoating large batches of figures on a nice day and boxing away for the bad weather.
- Flat brushes, I now use these to undercoat, varnish and on most of the initial block work on the figure. I find it quicker to use a flat. Round brushed to smaller detail.
- Use inks on hands and faces, whatever the style of the finished miniature hands and faces stand out. I paint flat shade, ink with Army Painter strong tone ink, then highlight up in layers (number dependent on the standard). Hands and faces technique remains the same for all styles regardless of the undercoat used.
- Undercoats, I use white, black, grey, brown and coloured. Whatever fits with the finished style, and is quickest. I like to use white for 15mm scale miniatures, as I use Army Painter on block colours then highlight up. Black with flat colours, and a simple style. It's just a matter of picking an undercoat that speeds up the process. Currently I'm painting 1866 Austrians, these have been sprayed grey, and will be ink washed and dry brushed.
- Hot glue is my friend. I use this for all basing of figures, temporary on paint stand and final basing. A word of caution, use only a very small amount on plastic figures they stick like ....to a blanket.
- One style of basing, keeps it easier to maintain a production line. I use filler, sand and pva glue, a dirty water wash and dry brush paint ( I may do a piece on basing later in the year). Flock, tufts can be added later.
I'll finish for now by saying look at other painters work and if possible ask if they'll spend a little time explaining a technique or better still a practical session. I find most people are willing to share their experiences if asked, it's how I continue to learn.